Sunday, October 23, 2016

Magic Loop for (Almost) Everything

This may be a bit simplistic, but I believe that when it comes to the issue of knitting in Magic Loop, most knitters either love it or hate it.
I'm in the camp with those who love it. "If it's round use magic Loop" is my mantra. "If it's round and there are two of them do two-at-a-time magic loop," I always say.
I have been knitting lots of fingerless mitts for Knits for Knowledge, and let me tell you, it's so much easier with magic loop. I can keep my pattern straight, I complete the pair together. Here's how a pair looks as I'm knitting them.
Now, within that "I love magic loop" camp there is a subset of radicals who even use magic loop for very small round things.
Seriously?!?! Does that even work? Yes, it absolutely does!
Yes, you guessed it, I'm one of those radicals. Here's my rationale. Why would I want to use four or five needles to knit something that is only eighteen, twelve, ten (pick a number) stitches around? That's too much fumbling for me.
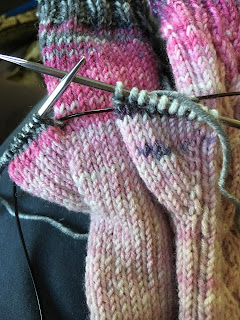
So, to illustrate, in these fingerless mitts, I'm showing you how I do the thumbs with magic loop two-at-a-time.
This collage shows steps in the process.
  • Top left - reserved thumb stitches
  • Top right - first half of thumb stitches transferred the front needles
  • Lower left - all thumb stitches transferred, waste yarn is still through the reserved stitches
  • Lower right - one round knitted, the second strand is tucked inside the thumb
The next photo shows a larger view of the work on the needles.
Thumbs completed and ready for bind-off. (I'm planning a post about binding off in magic loop.)
I hope you've enjoyed this post and it gives you confidence to use magic loop for loads of round knitting.

Tuesday, August 2, 2016

Giving Back

I have a friend who crochets rugs from old sheets and gives them away in return for a donation to her favorite charity. I hope you will visit her Facebook page and take a look. My family has gotten two beautiful rugs.
All of this has inspired me to do something similar. You can visit my favorite charity and read more about the Student Tuition Assistance Endowment. I will be knitting various items and like my friend giving them away for a donation to the charity. Eventually I expect to have a Facebook page, but for now, a message to me will suffice. Each item will have a suggested minimum donation and if shipping is required it will be at your expense. Clear as mud?

So...item #1...
Pink Fingerless Mitts One - My own design, stretchy enough to fit most women. Wool/Bamboo blend.

Shades of Blue Fingerless Mitts One - My own design, stretchy enough to fit most women. Wool/Bamboo blend.
You can see lots more at Knits for Knowledge

Tuesday, May 10, 2016

My Love/Hate Relationship with Dishcloths

I have been the recipient of several gift dishcloths, some knit and some crocheted, and because I feel true gratitude toward the person who put time and effort into creating these tools I begin to use them. That's when I remember what I don't like about them. Some have such a loose stitch that they feel flimsy. Then they start to smell funny. For a long time my husband didn't notice this smell, but recently it was so overpowering that even he could tell. The solution seemed to be to more not fewer of them so each could go into the laundry daily.
But...I'm not really excited about just knitting up a dishcloth when I could use my time and knit socks. Yay, socks!
I have arrived at a compromise, though. About 6 months ago a shop owner asked if I had tried designing my own socks. When I told her no, she replied that I would. I'm a skeptic, but wow, she was right!
And what in the world does that have to do with dishcloths? A bit of knitting in a square with larger cotton yarn is a great way to test a stitch I might want to incorporate into a sock. I can tell if the stitch will look better with solid yarn, flecked, variegated, or self-striping. I can tell if the fit will be loose or snug, and if I need to adjust gauge to compensate.
Two bonuses happen. I get a stockpile of dishcloths to launder regularly, and now I can start sharing dishcloth patterns. Because I know some people DO like to just knit them and seek out new designs.
First view of this pattern. It's not ready for publication since the pattern is too subtle for a variegated yarn to be used as this photo shows.
August 2, 2016 - a bit of an update. This is not ready at all. I've been using the dishcloth, and now the pattern is even less visible. I have some ideas, but right now I'm smack in the middle of another project.

Saturday, April 23, 2016

The Importance of a Lifeline (I'm Not 18 Anymore)

When I was 18/19/20 I was an avid knitter.

 I was also a college student. Multi-tasking (that's what it was, even if the term didn't exist) was my life. I could have my knitting in my hands and my textbook in my lap and never miss a stitch or mess up a pattern.
Now, (fill in the blank) years later, I can't even seem to carry on a conversation with my husband and knit at the same time.
I recently started knitting a sweater for him as I mentioned in my recent blog. The back and front have a fairly complicated cable, so I put in a lifeline every eight rows.
In this photo you can see the faint white lines which are my lifelines. I used a bit of fingering weight yarn left over from a pair of socks.
There are several ways to insert a lifeline, but this is my favorite:
First I have to share my favorite needles. Bear with me, it will make sense in a bit. My "go to" needles are my Addi Clicks. I love that I have (almost) every size I need at my fingertips and can purchase separate tips to complete those I might be missing.
But here is the best part - Addi makes a special replacement cord for the set that allows you to just knit along and the lifeline feeds itself into the row. The secret is a self-healing slit at each end of the cord near the join. Slip your yarn in the slit, knit the row, remove the yarn from the slit, and as you knit the next row your lifeline stays in place.

Which brings me to my lesson. 

That is my lesson to myself. You see, I saw the value of the lifeline as soon as I started the back of the sweater, and it did save the life of that piece of knitting twice. But then I started the sleeves - two at a time, because who wants to knit the same thing twice in a row. I felt that the pattern repeat was so simple (it's the basket weave you see on the sides of the sweater back) so I surely wouldn't need to go to the bother of taking that extra step. Well, I just told you it was simple. Why did I think it was a bother?
So I was blithely knitting along, brain on auto-pilot and totally forgot to do the increases. Had to rip all the way out a start over.
Second time through, I remembered the increases but somehow got my two sleeves turned around and had too many rows in one or not enough rows in the other. Since I didn't know which had the increases correct I had to rip out back as far as the ribbing.
Third time though - slow learner - I'm using the life line!

Smooth going, and if I have to rip now it will only be to the most recent increase row.

Saturday, April 2, 2016

When your husband asks...

My husband has been watching me knit since I took it up again a few years ago. Several weeks ago he paid me the ultimate compliment.
He ASKED me to knit him a sweater.
I've begun it, and I'll try to remember to track my progress here.
Loving this pattern and yarn. I'm using Cilantro Heather.


Sunday, January 24, 2016

Tips and Tricks - An Unexpected Benefit

As mentioned in my previous post, Tips and Tricks - That Gap at the Heel, I basted the front and back of the leg together to eliminate strain.
For this particular heel, I'm adding a bit of duplicate stitch. I learned while knitting my last sock that this is much more easily done before the heel turn.
So here is the benefit of the basting. That piece of heel is now almost completely flat!
Here are photos of the heel front and back. 

My nice flat piece of knitting with the added duplicate stitch


Saturday, January 23, 2016

Tips and Tricks - That Gap at the Heel

I've been frustrated by the gap that develops at the heel of my socks. I always do two at a time, magic loop. I feel that the gap occurs as the reserved stitches on the cord at the back weigh down the area between the front and back thus distorting it.
This is my attempt to fix that. To prevent stress at that spot-after about 10 rows of working the heel I basted the two halves of the leg together. We’ll see.
I'll be updating as I go. 

This photo shows the basting from the heel side. Unfortunately, when I came up with the plan I grabbed the waste yarn at hand, and black doesn't show well on dark green. 

Update
I've finished knitting the heel, and I'm pleased to report that so far I see no stretching. This close up of the intersection should show that. 
I have a bit of duplicate stitch to do on the heels now before I turn them. 

I have the gusset nearly completed and am happy to report that I still see no gap. I left the basting in for the entire gusset although I probably would not have needed to.


Top Down Rounded Toe


Top Down Rounded Toe

I prefer a rounded toe in my socks, and most frequently work toe-up for which I found an excellent "how-to."
However, sometimes because of pattern attributes I need to work the socks top down. I was unable to locate a toe I liked. Therefore, I created this one.

Begins with 64 sts (32 per needle in magic loop).
If your sock has more stitches, see the **NOTE** after row 5
                       
Row 1   *K1, SKP, knit to last 3 sts, k2tog, K1* repeat     
60 sts remain

Row 2   knit all sts        
           
Row 3   knit all sts        
                       
Row 4   *K3, SKP, knit to last 5 sts, k2tog, K3* repeat     
56 sts remain

Row 5   *K1, SKP, knit to last 3 sts, k2tog, K1*    repeat
52 sts remain

**NOTE** If you began with more than 64 sts, repeat rows 3 to 5 until 52 sts remain.

Row 6   knit all sts        
                       
Row 7   *K3, SKP, knit to last 5 sts, k2tog, K3* repeat     
48 sts remain

Row 8   *K1, SKP, knit to last 3 sts, k2tog, K1* repeat     
44 sts remain

Row 9   knit all sts        
                       
Row 10             *K3, SKP, knit to last 5 sts, k2tog, K3* repeat     
40 sts remain

Row 11             *K1, SKP, knit to last 3 sts, k2tog, K1* repeat     
36 sts remain

Row 12 *K3, SKP, knit to last 5 sts, k2tog, K3* repeat     
32 sts remain

Row 13             *K1, SKP, knit to last 3 sts, k2tog, K1* repeat     
28 sts remain

Bind off in Kitchener stitch.

Download PDF Top Down Rounded Toe

In Storage

The more I knit, the more I realize that I need a place for the ideas I develop. Whether anyone else finds these useful or not, I hope that I will be able to referrence.
The older I get the more reminders I need!